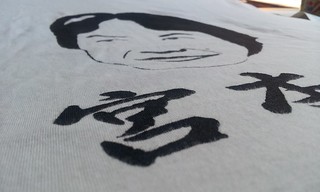
Behold! I made a Tee Shirt!
 So here's what I did: I searched myself a nice video tutorial on YouTube, like this vid by Mariusb1989 about Stencil ― because YouTube is one way how I learn shit. I studied the tutorial and took my time planning the following steps.
Because I have the false impulse of trying to be perfect on the first attempt, I deliberately went for another design. Although, that was the wrong method of dealing with that false impulse: instead, I should have just done it with the first design in order to learn from the mistakes. Because it's okay to make mistakes. But that's something for another story … Anyway, I chose a design that was supposed to be easier – but ended up being harder (›‹ ) – namely, a stylized silhouette of my biggest inspiration: Shigeru Miyamoto, father of Mario, Donkey Kong, Zelda and many more.
While preparing my shopping list for Creativ Discount here in D-Town, I already began composing a design in Photoshop. For this I used a picture found in Google Images. Two actually, because his forehead was partly cut off in the first one. After creating a rough "complete" head, I began searching for a fitting shape of vector graphics by opening the Edit › Image › Polarize popup window. Picking one of the choices (or maybe two if necessary, and then merging together what you need), you can have an emphasized version of the shades & highlights in his face.
Now I created myself a vector shape layer with the help of one of the color channels where the contrast between black & white is much stronger – though I only used that as a rough guideline and then hand-drew the shape myself. What I wanted was something more stylized than realistic, after all.
 After a lot of busy work I had a head of Shigeru as well as his name, available in beautiful mono-color vector graphics ― meaning that you can resize the whole thing without any loss of information. I chose a size and printed it. (Actually just its contours, to save printer ink).
[ Woody's Checkpoint: # top # ]
Next up came the creation of the stencil. For this, I glued the printed paper to a transparent sheet ― and started cutting. Patience & perseverance.
After all this preparation I could finally execute the main task: applying the paint. Using a brush, I spread a layer of black paint into the stencil's holes, which I rolled smooth with that smooth-roll-thingy. After I was done with that and could peel off the stencil, I manually fixed the bridges with a fine brush for more detail. Letting it dry, washing, letting dry once more. Donebear! I think I made the pupils too small, and I accidentally painted an unwanted extra spot of black smudge, but overall I'm quite satisfied. Some more pics of the process can be seen on my Flickr.… aaaand then I noticed that I misspelled his name. GARGH! (-.-' ) So I re-did it. And this new shirt even has the unikGamer logo on its back – because I now want to show off both designs at GamesCom ;^p
Oh yeah, I almost forgot: Here's the photoshop file so you can create your own Miyamoto-Shirts ;^)
posted by Woodrow at 7/26/2012 12:14:00 PM
0 comments


0 Comments:
Post a Comment